Build a Private Payment System Using INCO Network

Actively looking for Smart Contract Developer, DevRel and Technical Writer Role.
ex Smart Contract Developer @Lighthouse | Technical Writer | @QuickNode Ambassador | @chainlink Developer Expert & Community Advocate | Contributor @Developer_DAO, @LearnWeb3DAO and @eden
Built over 70 dapps and published 19 tutorials in web3
How to Build a Private Payment System on the Inco Network for Transferring Tokens Without Revealing Their Amount
Overview
Welcome to the era of enhanced privacy in blockchain applications! If you're seeking to harness the speed, security, and transparency of blockchain technology but are concerned about protecting sensitive data, you're in the right place. Enter the Inco Network: a groundbreaking solution that not only allows you to securely store data in encrypted form but also enables on-chain computations on this encrypted data.
In this tutorial, we delve into the world of Inco Network, a protocol that stands at the forefront of data privacy in blockchain applications. We'll guide you through the process of constructing a private payment system within the Inco Network, demonstrating how to manage and interact with encrypted data on-chain. Whether you're building an application that demands confidentiality or simply intrigued by the possibilities of privacy-preserving blockchain technology, this tutorial is your gateway to mastering encrypted data handling in the blockchain realm.
What You Will Do
Understand the Basics of Inco Network
Master Encrypted Data Types and Operations
Dive into Inco Remix (Yes, Inco has its own remix to provide an amazing developer experience)
Engage in Hands-On Smart Contract Development
What You Will Need
Basic understanding of Solidity
Basic understanding of Remix
Knowledge of Fungible Token
What is Inco Network
Inco Network is an EVM Layer-1, utilizing fully homomorphic encryption (FHE) to enable composable and operable confidential states. Our fhEVM (FHE + EVM) makes it possible to write private smart contracts and perform computations on top of encrypted data without requiring its decryption. This innovation unlocks a wide range of use cases with confidentiality components, such as card games, DID, private voting, dark pools, etc. - paving the way for a new era of possibilities.
Why should we use Inco Network?
In this tutorial, we won't delve deeply into fully homomorphic encryption (FHE), as it is designed to be a hands-on guide for builders, not a research paper on FHE. For those familiar with the term ZK, you might be wondering, 'Why not use zero-knowledge (ZK) proofs?' While ZK proofs are applicable in certain contexts, they are not feasible in others. Let me briefly explain why.
Zero-knowledge (ZK) cryptography is a method of maintaining privacy on the internet. It's akin to a special code that allows you to prove your knowledge without revealing the actual information. This technique is particularly useful in technologies like zk-rollups to enhance internet functionality.
However, ZK cryptography has its challenges. It's effective for maintaining privacy in scenarios involving a single participant, but it becomes complex or even unfeasible in situations with multiple participants, such as in card games or voting systems.
Moreover, utilizing ZK requires substantial effort and a deep understanding of technical concepts. The confidential data must be isolated from the primary system, and the process of proving knowledge can be resource-intensive.
We believe that privacy solutions should be simpler and integrated directly into the core system. Developers ought to have the ability to incorporate privacy-preserving codes into their applications, making them both flexible and user-friendly. This approach could lead to innovative internet applications that were previously unachievable.
One of the greatest benefits of using the Inco Network is the ability to develop decentralized applications (dApps) using existing programming languages (like Solidity) and tools (such as Remix and Hardhat). If you're already familiar with EVM smart contract development, transitioning to fhEVM development is a straightforward process.
Let's Build
It's time to put your understanding of the Inco Network into action. In this section, we're going to construct a decentralized application (dApp) that Illustrates privacy and efficiency. Our project is a Private Payment System, designed to securely store and process employee salaries in an encrypted format.
Rather than using the Inco Network's native tokens, we'll take a step further. You'll learn how to craft your own encrypted token and utilize it for transactions within our system. This practical application will involve creating two smart contracts:
EncryptedERC20.sol: This is your custom ERC-20 token, offering the functionality of a standard fungible token with an added layer of encryption for enhanced privacy.
Payment.sol: This contract represents the backbone of our payment system, handling the distribution of salaries using our EncryptedERC20 token.
As we delve into these contracts, you'll gain hands-on experience in deploying sophisticated blockchain solutions that prioritize data privacy and user security
Before we begin
Before diving into building, it's crucial to set up your development environment correctly. This preparation ensures a smooth and efficient building process:
Integrate Inco Network with MetaMask: Start by adding the Inco Network (DevNet) to your MetaMask wallet. This step is vital for connecting to the Inco Network during development and testing. Here's a guide on how to add the Inco Network to MetaMask.
Acquire Inco Test Tokens: To interact with the network, your account will need Inco test tokens. These tokens are essential for deploying contracts and simulating transactions in the development stage. You can obtain these tokens from the Inco Network faucet.
Step 1. Create EncryptedERC20 Token
In our first step, you'll innovate by creating an ERC-20 token with a twist: it's encrypted. This EncryptedERC20 token exemplifies the unique capabilities of the Inco Network, enabling us to securely handle sensitive data like employee salaries.
Your journey begins with understanding and utilizing specialized data types and operations in the fully homomorphic EVM (fhEVM) environment. Think of fhEVM as an extension of the familiar Ethereum Virtual Machine (EVM), enhanced with powerful TFHE (fully homomorphic encryption) functionalities. These functions allow for sophisticated operations such as encrypted data decryption, multiplication, and comparison, all while maintaining data privacy.
// SPDX-License-Identifier: BSD-3-Clause-Clear
// EncryptedERC20.sol
pragma solidity >=0.8.9 <0.9.0;

// Importing necessary fhEVM libraries
import "fhevm/lib/TFHE.sol";
import "fhevm/abstracts/EIP712WithModifier.sol";

contract EncryptedERC20 is EIP712WithModifier {
    euint32 private totalSupply;
    string public constant name = "CUSD";
    uint8 public constant decimals = 18;

    // used for output authorization
    bytes32 private DOMAIN_SEPARATOR;

    // A mapping from address to an encrypted balance.
    mapping(address => euint32) internal balances;

    // The owner of the contract.
    address internal contractOwner;

    modifier onlyContractOwner() {
        require(msg.sender == contractOwner);
        _;
    }

    constructor() EIP712WithModifier("Authorization token", "1") {
        contractOwner = msg.sender;
    }

    // Sets the balance of the owner to the given encrypted balance.
    function mint(bytes calldata encryptedAmount) public {
        euint32 amount = TFHE.asEuint32(encryptedAmount);
        balances[msg.sender] = TFHE.add(balances[msg.sender], amount);
        totalSupply = TFHE.add(totalSupply, amount);
    }

    // Transfers an encrypted amount from the message sender address to the `to` address.
    function transfer(address to, bytes calldata encryptedAmount) public {
        transfer(to, TFHE.asEuint32(encryptedAmount));
    }

    // Transfers an amount from the message sender address to the `to` address.
    function transfer(address to, euint32 amount) public {
        _transfer(msg.sender, to, amount);
    }

    // Get the total supply of encrypted token
    function getTotalSupply(
        bytes32 publicKey,
        bytes calldata signature
    ) public view onlyContractOwner onlySignedPublicKey(publicKey, signature) returns (bytes memory) {
        return TFHE.reencrypt(totalSupply, publicKey);
    }

    // Returns the balance of the caller under their public FHE key.
    // The FHE public key is automatically determined based on the origin of the call.
    function balanceOf(
        bytes32 publicKey,
        bytes calldata signature
    ) public view onlySignedPublicKey(publicKey, signature) returns (bytes memory) {
        return TFHE.reencrypt(balances[msg.sender], publicKey, 0);
    }

    // Transfers an encrypted amount.
    function _transfer(address from, address to, euint32 amount) internal {
        // Make sure the sender has enough tokens.
        TFHE.optReq(TFHE.le(amount, balances[from]));

        // Add to the balance of `to` and subract from the balance of `from`.
        balances[to] = TFHE.add(balances[to], amount);
        balances[from] = TFHE.sub(balances[from], amount);
    }

    // Get the address of the contract owner
    function getContractOwner() public view returns (address) {
        return contractOwner;
    }
}
Our EncryptedERC20 contract diverges from standard EVM contracts, incorporating unique features of the Inco Network's fully homomorphic encryption (FHE) capabilities. Let's decode its components and functionalities:
import "fhevm/lib/TFHE.sol";
TFHE.sol library unlocks a range of TFHE functions like ebool, euint32, TFHE.eq(), and more, enhancing our contract with encrypted data handling capabilities.
import "fhevm/abstracts/EIP712WithModifier.sol";
Essential for generating public keys for decrypting encrypted data. It's a feature unique to the Inco network, ensuring that only authorized users can decrypt and re-encrypt data.
constructor() EIP712WithModifier("Authorization token", "1") {
        contractOwner = msg.sender;
    }
Here, we initialize the EIP712WithModifier library with a custom contract name and version. You can use any name and version.
// Sets the balance of the owner to the given encrypted balance.
    function mint(bytes calldata encryptedAmount) public {
        euint32 amount = TFHE.asEuint32(encryptedAmount);
        balances[msg.sender] = TFHE.add(balances[msg.sender], amount);
        totalSupply = TFHE.add(totalSupply, amount);
    }
The mint function takes the amount in byte form and mints CUSD tokens of that amount. There's a learning curve here:
Unlike in traditional ERC-20 tokens, where amounts are specified in uint, we use bytes here to maintain privacy. The TFHE.asEuint32(encryptedAmount) function converts this into an encrypted euint32 type. euint32 is a specialized encrypted data type for the Inco network, resembling uint32 but in encrypted form.
If you're curious about what euint32 and TFHE.asEuint32 are, you can learn more about these encrypted types here.
line 1 : euint32 amount = TFHE.asEuint32(encryptedAmount);
Line 1: The initial step involves transforming raw byte input into its encrypted equivalent using TFHE (Fully Homomorphic Encryption). This encrypted data is then assigned to the variable amount, which is of the datatype euint32.
line 2 : balances[msg.sender] = TFHE.add(balances[msg.sender], amount);
Line 2: Here, the balance of the caller is updated by adding the newly encrypted amount to their existing balance. This operation uses TFHE.add(), a function specific to fhEVM (Fully Homomorphic Ethereum Virtual Machine), designed to perform arithmetic operations on encrypted data. It accepts two encrypted binary inputs and returns their sum, also in encrypted form.
line 3 : totalSupply = TFHE.add(totalSupply, amount);
Line 3: Similarly, this line updates the totalSupply by adding the encrypted amount to the existing total. The TFHE.add() function is used again to ensure that the computation remains within the encrypted domain.
function getTotalSupply(
        bytes32 publicKey,
        bytes calldata signature
    ) public view onlyContractOwner onlySignedPublicKey(publicKey, signature) returns (bytes memory) {
        return TFHE.reencrypt(totalSupply, publicKey);
    }
Function getTotalSupply: This function retrieves the total number of tokens ever minted. It requires two parameters: publicKey and signature. The onlySignedPublicKey modifier, inherited from the EIP712WithModifier library, ensures that the caller is the legitimate owner of the public key. It does this by requiring the caller to sign a message with their private key, which is then verified on-chain.
line 1 : return TFHE.reencrypt(totalSupply, publicKey);
Line 1 ingetTotalSupply(): This line decrypts the encrypted totalSupply data, but only for the caller. TFHE.reencrypt is a crucial function here; it enables confidential value decryption by transforming the ciphertext, which is encrypted under the global FHE key, into another ciphertext encrypted with a temporary public key provided by the user. This allows the user to decrypt the new ciphertext with their corresponding temporary private key, a process that takes place client-side.
Generating PublicKey and Signature: You might wonder how to generate the publicKey and signature required for getTotalSupply. There are primarily two ways to accomplish this: using the fhevmjs JavaScript library (which facilitates interactions with the fhEVM protocol) and INCO Remix. For the purpose of this tutorial, we will focus on using INCO Remix.
Step 2. Deploy Encrypted ERC20 Token
Now that you understand how to write a smart contract on fhEVM, let's proceed to deploy your smart contract on the Inco network.
Open the Inco Remix
Inco Remix is a fork of the Ethereum Remix, featuring additional functionalities like generating a public key and signature.
Create new file
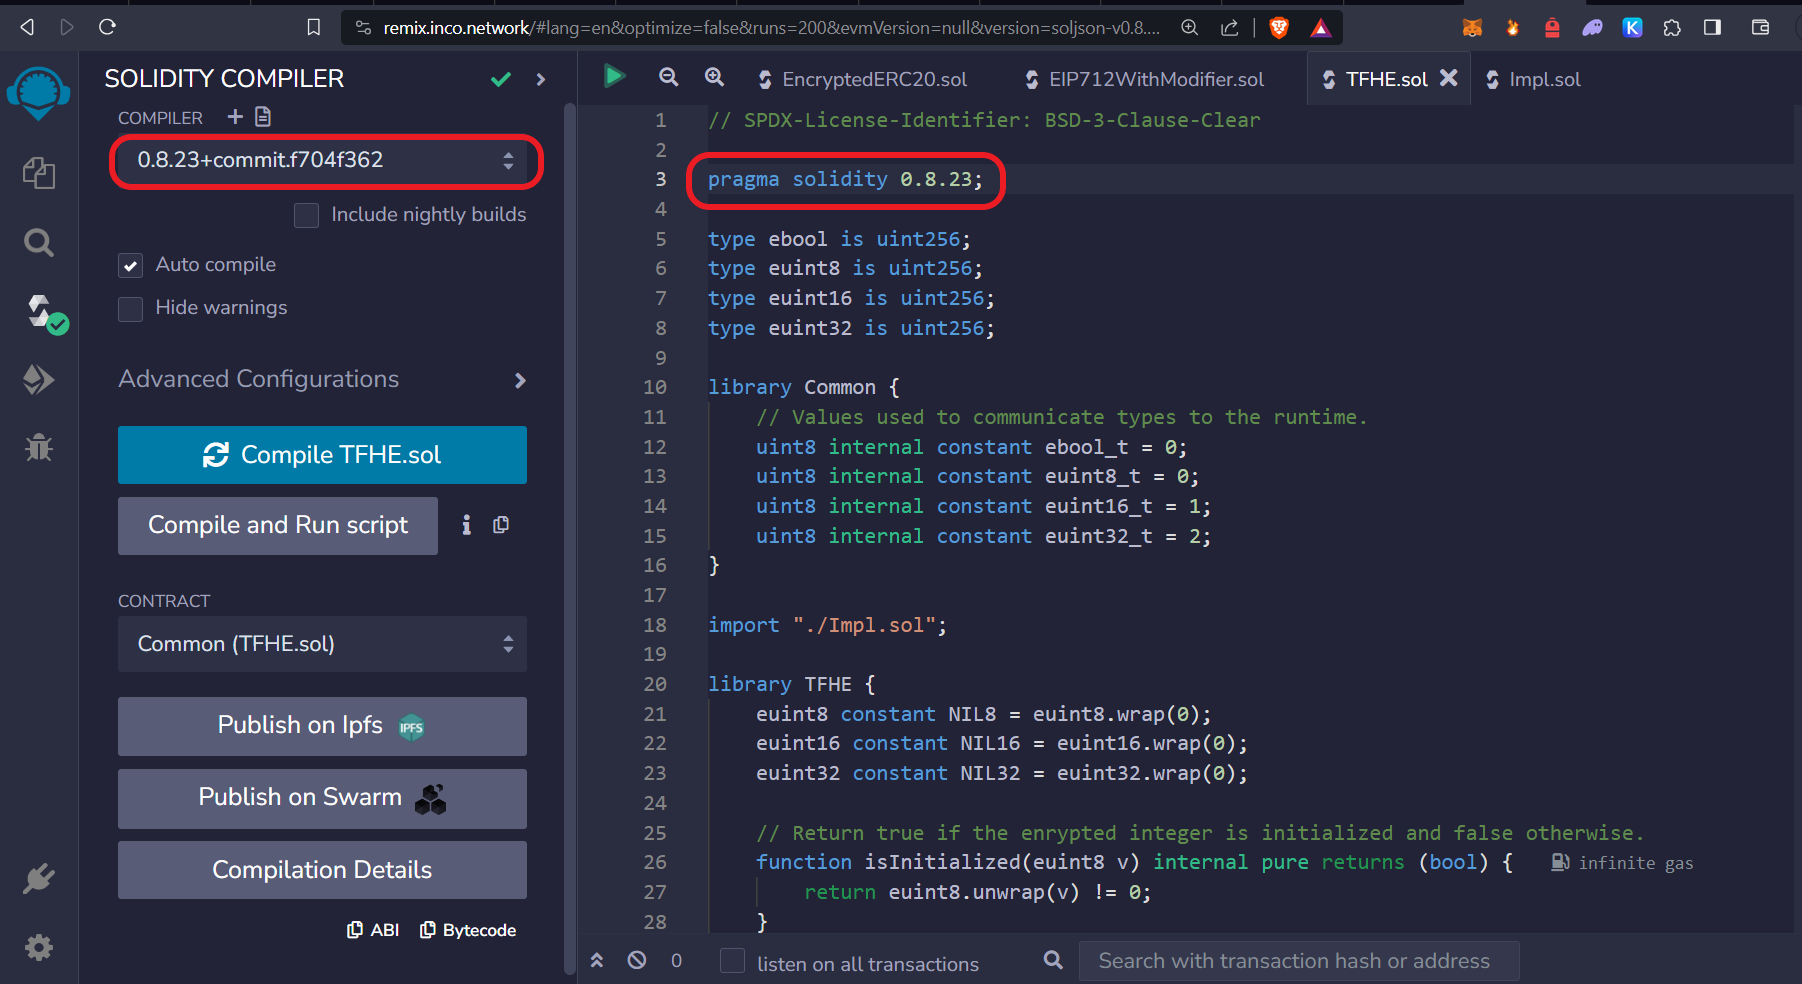
In the Remix, create a new file named EncryptedERC20.sol and copy-paste your code into this file.

If you encounter an error, switch the Solidity version to 0.8.23 in the TFHE library contracts and set the compiler to the same version.
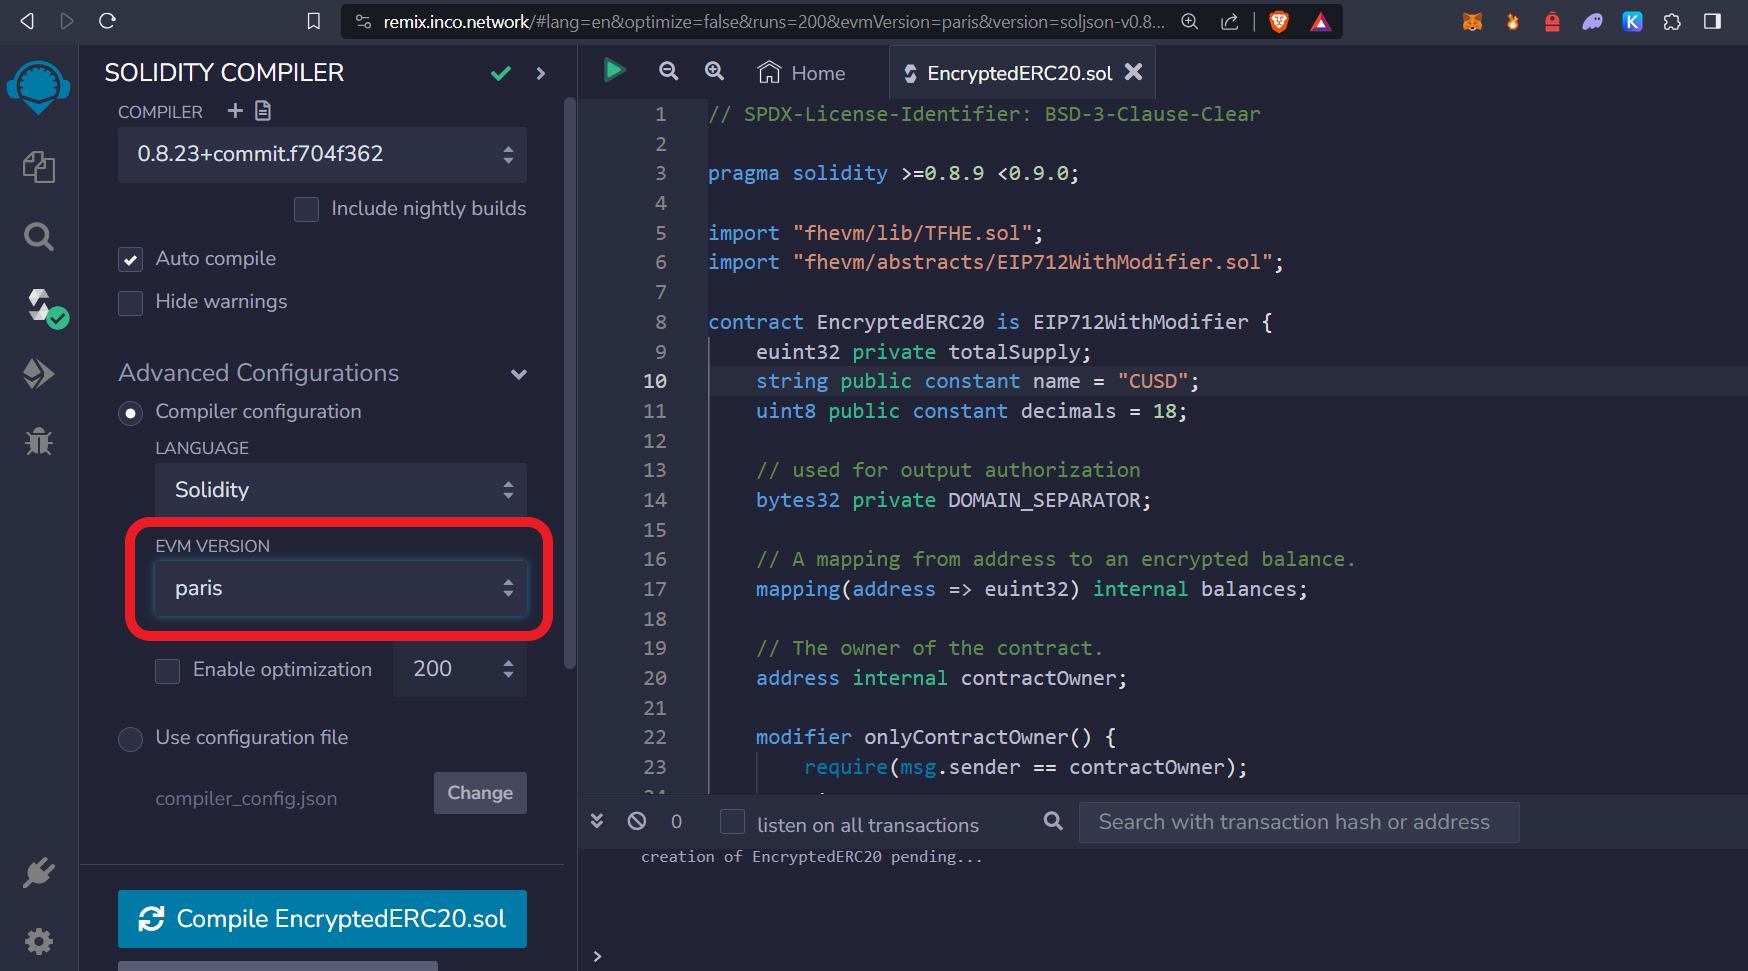
Click on Advanced Configurations and change the EVM Version to Paris.
Deploy the Smart Contract
With the code and settings ready, it's time to deploy your smart contract on the Inco Network.
Configure Metamask: Select the 'Inco Network DevNet' on Metamask. If you haven't added this network, refer to the 'Connect Metamask' guide for assistance.
Environment Selection: In the Remix environment, choose 'Injected Provider' as your deployment method.
Initiate Deployment: Click on the 'Deploy' button and authorize the transaction in Metamask.
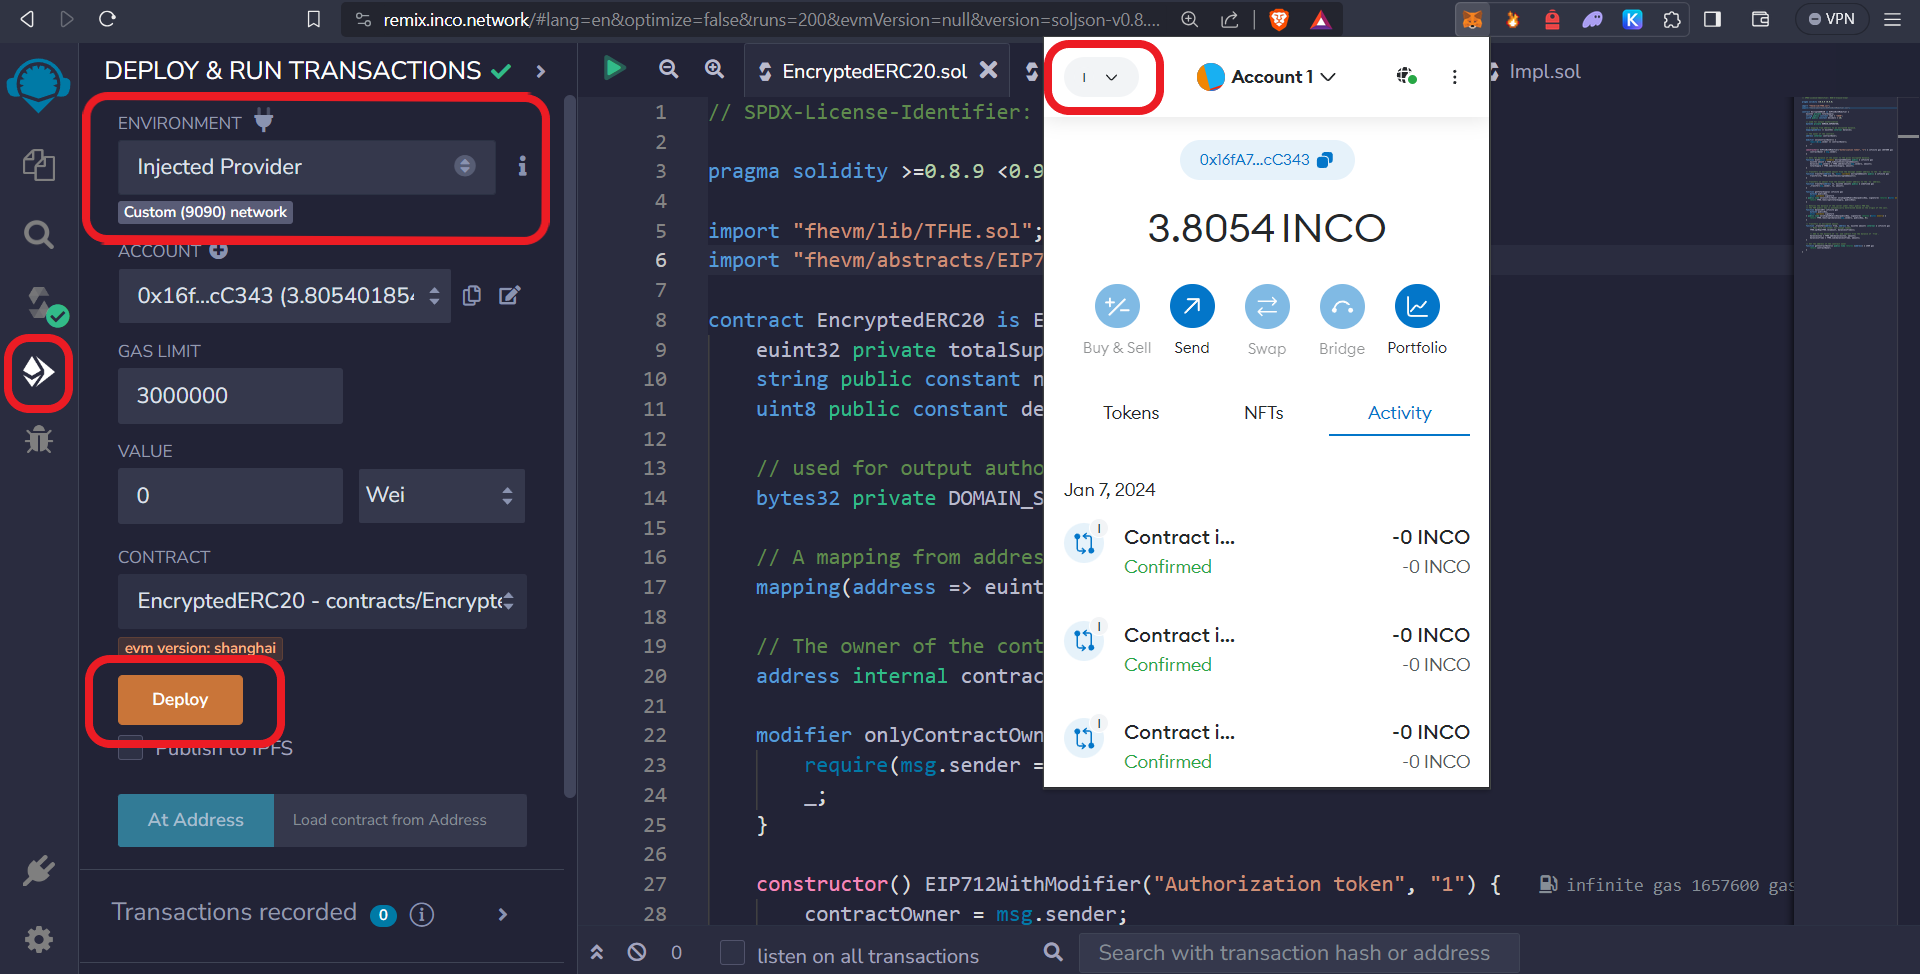
Congratulations! You have successfully deployed your first smart contract on the Inco Network. Remember to save the contract’s address for future use.
Step 3. Interact with EncryptedERC20 Smart Contract
Our Remix fork automatically encrypts plaintext. To do this, simply use a function that takes in bytes and select the appropriate option from the dropdown menu:
Minting Tokens
Here, you will mint 1000 CUSD tokens. Notice that instead of inputting a byte value, you will input a simple unit value and select euint32 from the dropdown box.
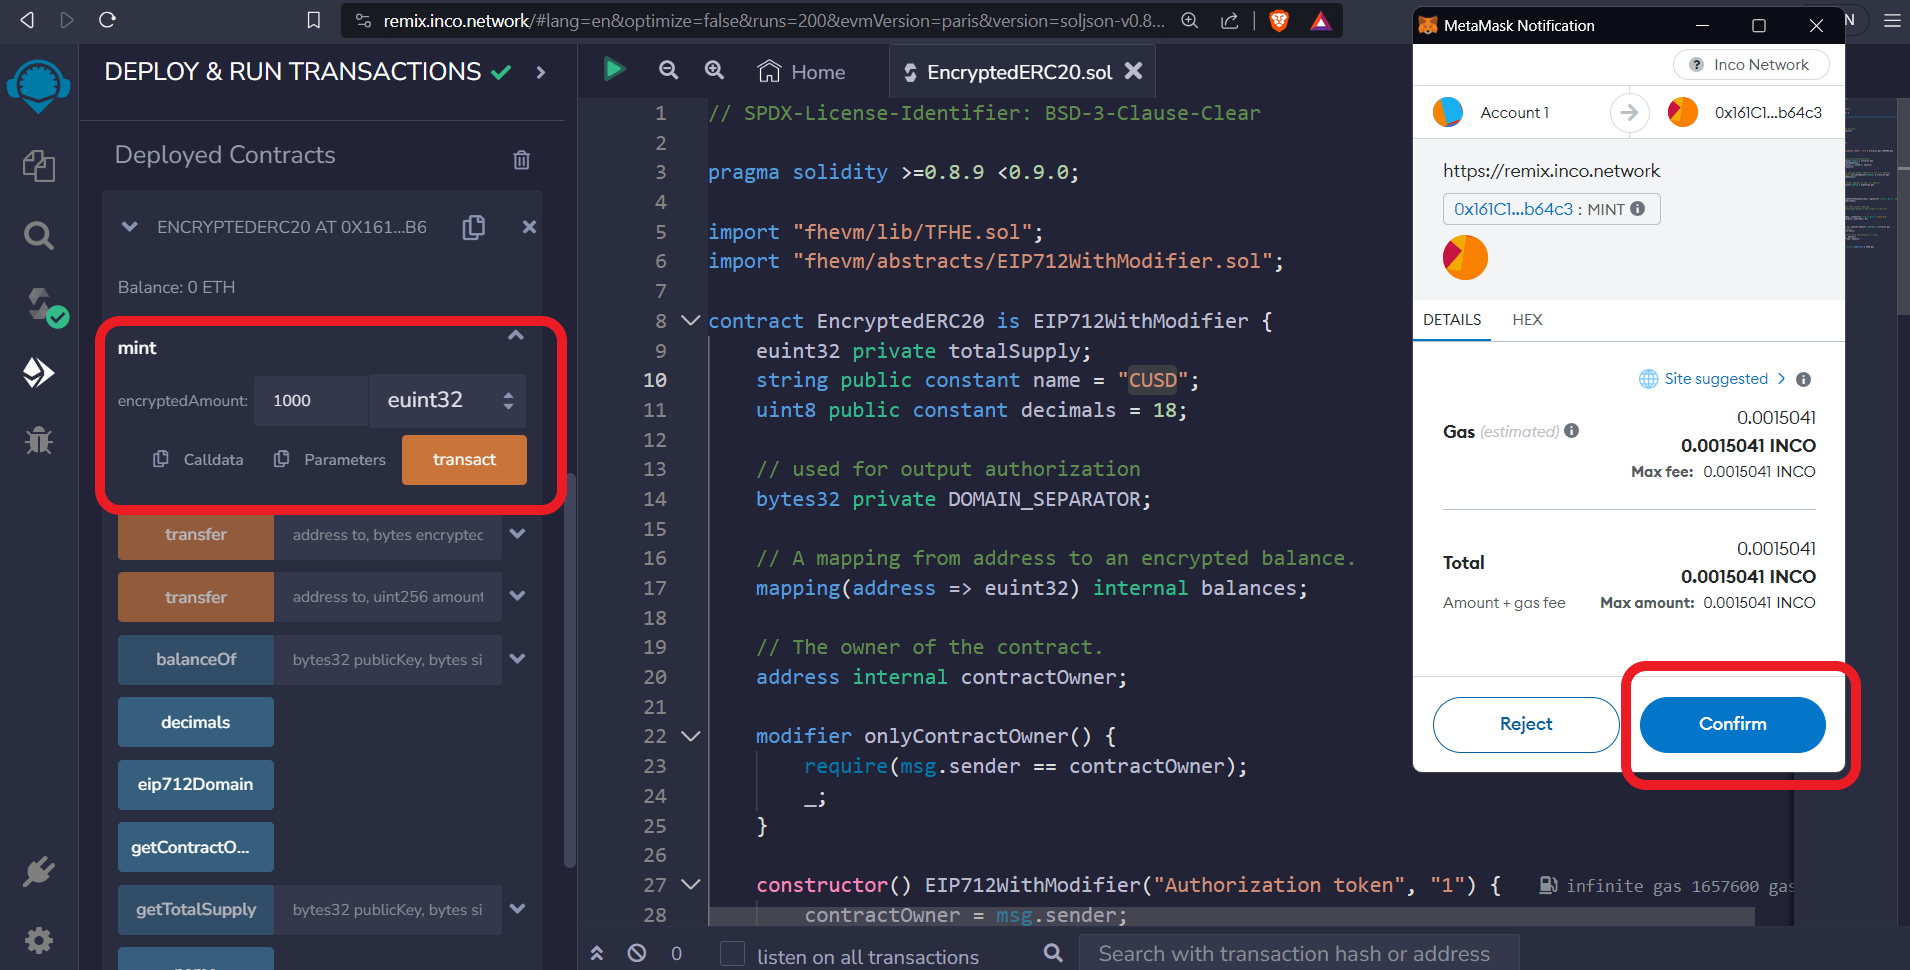
If you're wondering why we use euint32 instead of euint8 or any other encrypted datatype, it's because we encrypt the data in euint32 datatype.
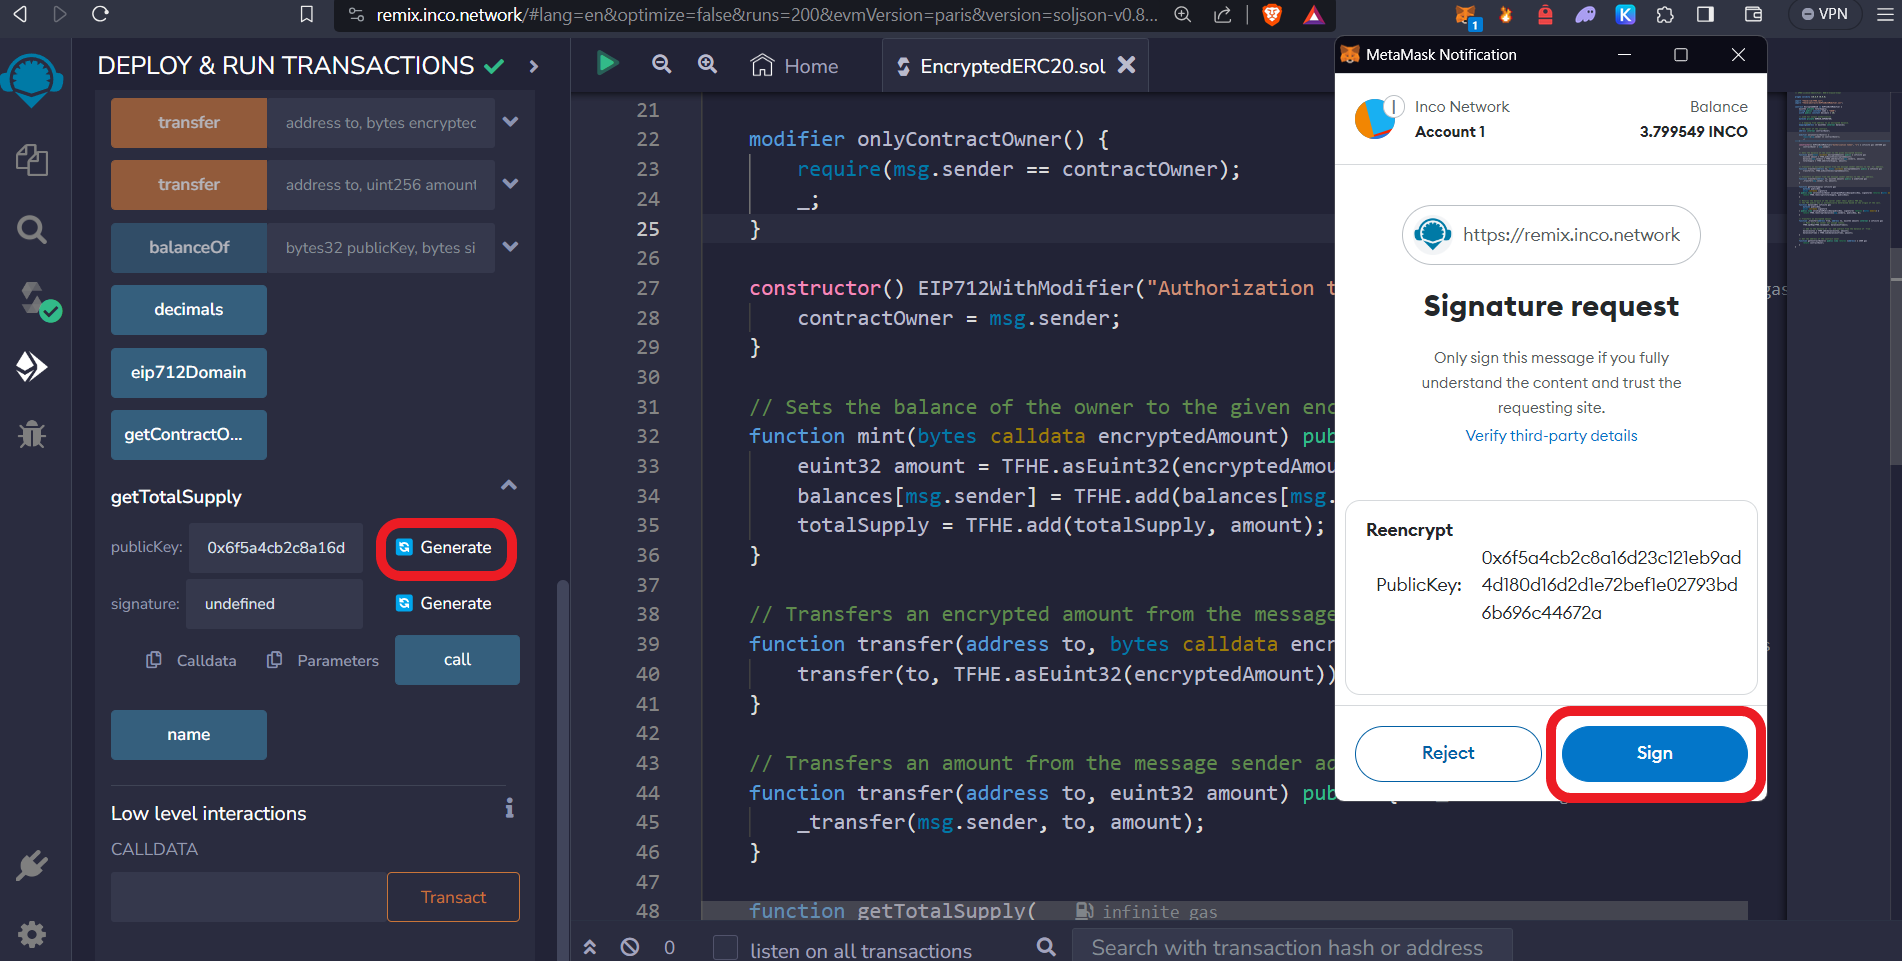
Get Total Supply
To view the total supply of minted CUSD tokens, two parameters are necessary: publicKey and signature.
Generating Parameters: Our Remix fork facilitates this step. Simply click the 'Generate' button. This action prompts you to sign a message in Metamask, which in turn generates the required
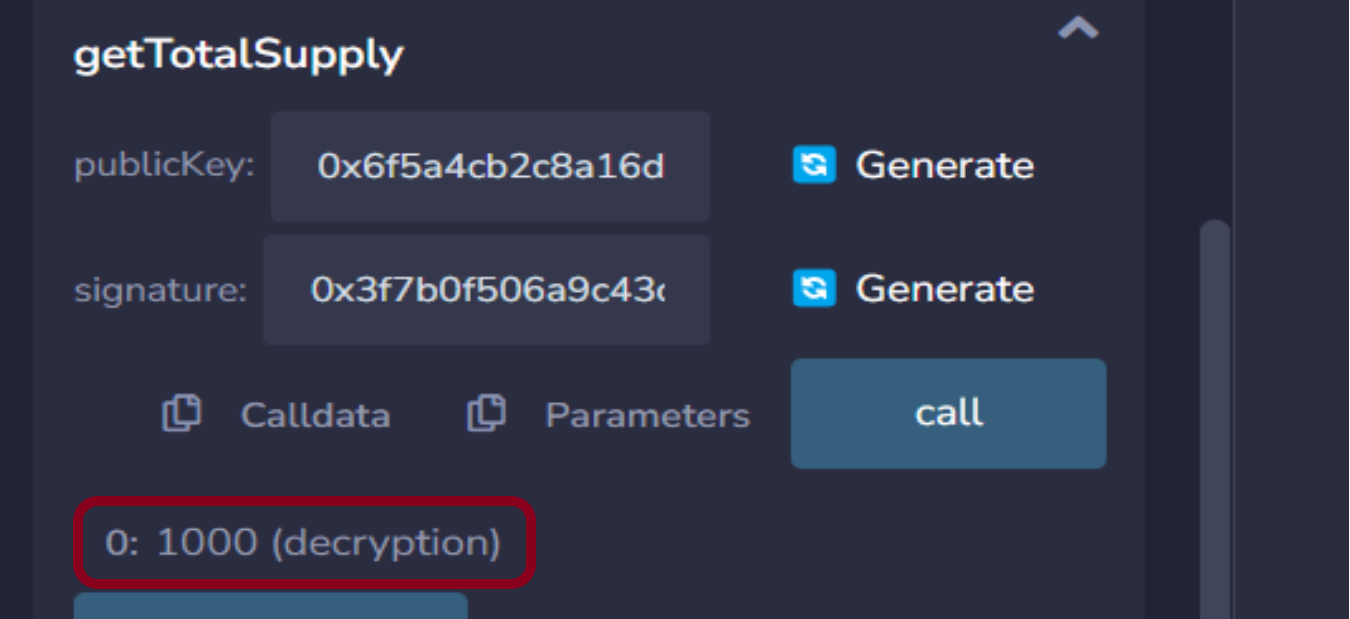
publicKeyandsignature.Retrieving Total Supply: After generating the parameters, click on the 'Call' button to obtain the total supply information.
Upon completing these steps, the total supply of CUSD tokens, which in this case should be '1000', will be displayed.
Step 4. Create Payment System Contract
With your encrypted ERC20 Tokens ready, you'll now build a smart contract to manage employee address and their salaries. In this system, while employee addresses are public, their salaries remain confidential. Encrypted ERC20 Tokens will be used to pay employees.
// SPDX-License-Identifier: BSD-3-Clause-Clear
// Payment.sol
pragma solidity >=0.8.9 <0.9.0;

import "fhevm/lib/TFHE.sol";

interface IEncryptedERC20 {
    function transfer(address to, euint32 amount) external;
}

contract Payment {
    address public owner;
    mapping(address => euint32) public salary;

    // Event declarations
    event EmployeeUpdated(address indexed employee, euint32 salary, ebool value);
    event SalaryPaid(address indexed employee, euint32 salary);

    // Modifier to allow only the owner to execute certain functions
    modifier onlyOwner() {
        require(msg.sender == owner, "Only the owner can perform this action.");
        _;
    }

    constructor() {
        owner = msg.sender; // Set the contract deployer as the owner
    }

    // Function to add or update an employee's salary
    function setEmployee(address _employee, bytes calldata _salary) public onlyOwner {
        salary[_employee] = TFHE.asEuint32(_salary);
    }

    // Function to pay an employee's salary
    function payEmployee(address _employee, address _token) public onlyOwner {
        ebool validEmployee = TFHE.ge(salary[_employee], TFHE.asEuint32(0));
        TFHE.optReq(validEmployee);
        euint32 employeeSalary = salary[_employee];

        IEncryptedERC20(_token).transfer(_employee, employeeSalary);
    }
}
Again let's break down the smart contract line by line, highlighting the differences from a traditional smart contract.
import "fhevm/lib/TFHE.sol";
Import TFHE.sol for utilizing encrypted data types and operations within the contract.
interface IEncryptedERC20 {
    function transfer(address to, euint32 amount) external;
}
Create an IEncryptedERC20 interface. This interface enables interaction with the EncryptedERC20 smart contract's transfer function, which is essential for salary distribution.
mapping(address => euint32) public salary;
Create a mapping to store employee addresses along with their corresponding encrypted salaries.
function setEmployee(address _employee, bytes calldata _salary) public onlyOwner {
        salary[_employee] = TFHE.asEuint32(_salary);
    }
The setEmployee function takes an employee's address and their salary (as bytes). It then stores the salary in an encrypted euint32 format.
function payEmployee(address _employee, address _token) public onlyOwner {
        ebool validEmployee = TFHE.ge(salary[_employee], TFHE.asEuint32(0));
        TFHE.optReq(validEmployee);
        euint32 employeeSalary = salary[_employee];

        IEncryptedERC20(_token).transfer(_employee, employeeSalary);
    }
The payEmployee function transfers tokens to an employee
line 1 : ebool validEmployee = TFHE.ge(salary[_employee], TFHE.asEuint32(0));
TFHE.ge() checks whether an employee's salary is greater than 0 and returns a boolean value. TFHE.asEuint32 is used to convert the uint32 value to an encrypted value, and ebool validEmployee is used to store this value.
line 2 : TFHE.optReq(validEmployee);
TFHE.optReq is an optimistic encrypted require statement that would fail a transaction if a ebool condition is false. This operation is executed at the end of the execution.
IEncryptedERC20(_token).transfer(_employee, employeeSalary);
Finally, the transfer function of the EncryptedERC20 contract is used to securely transfer the salary.
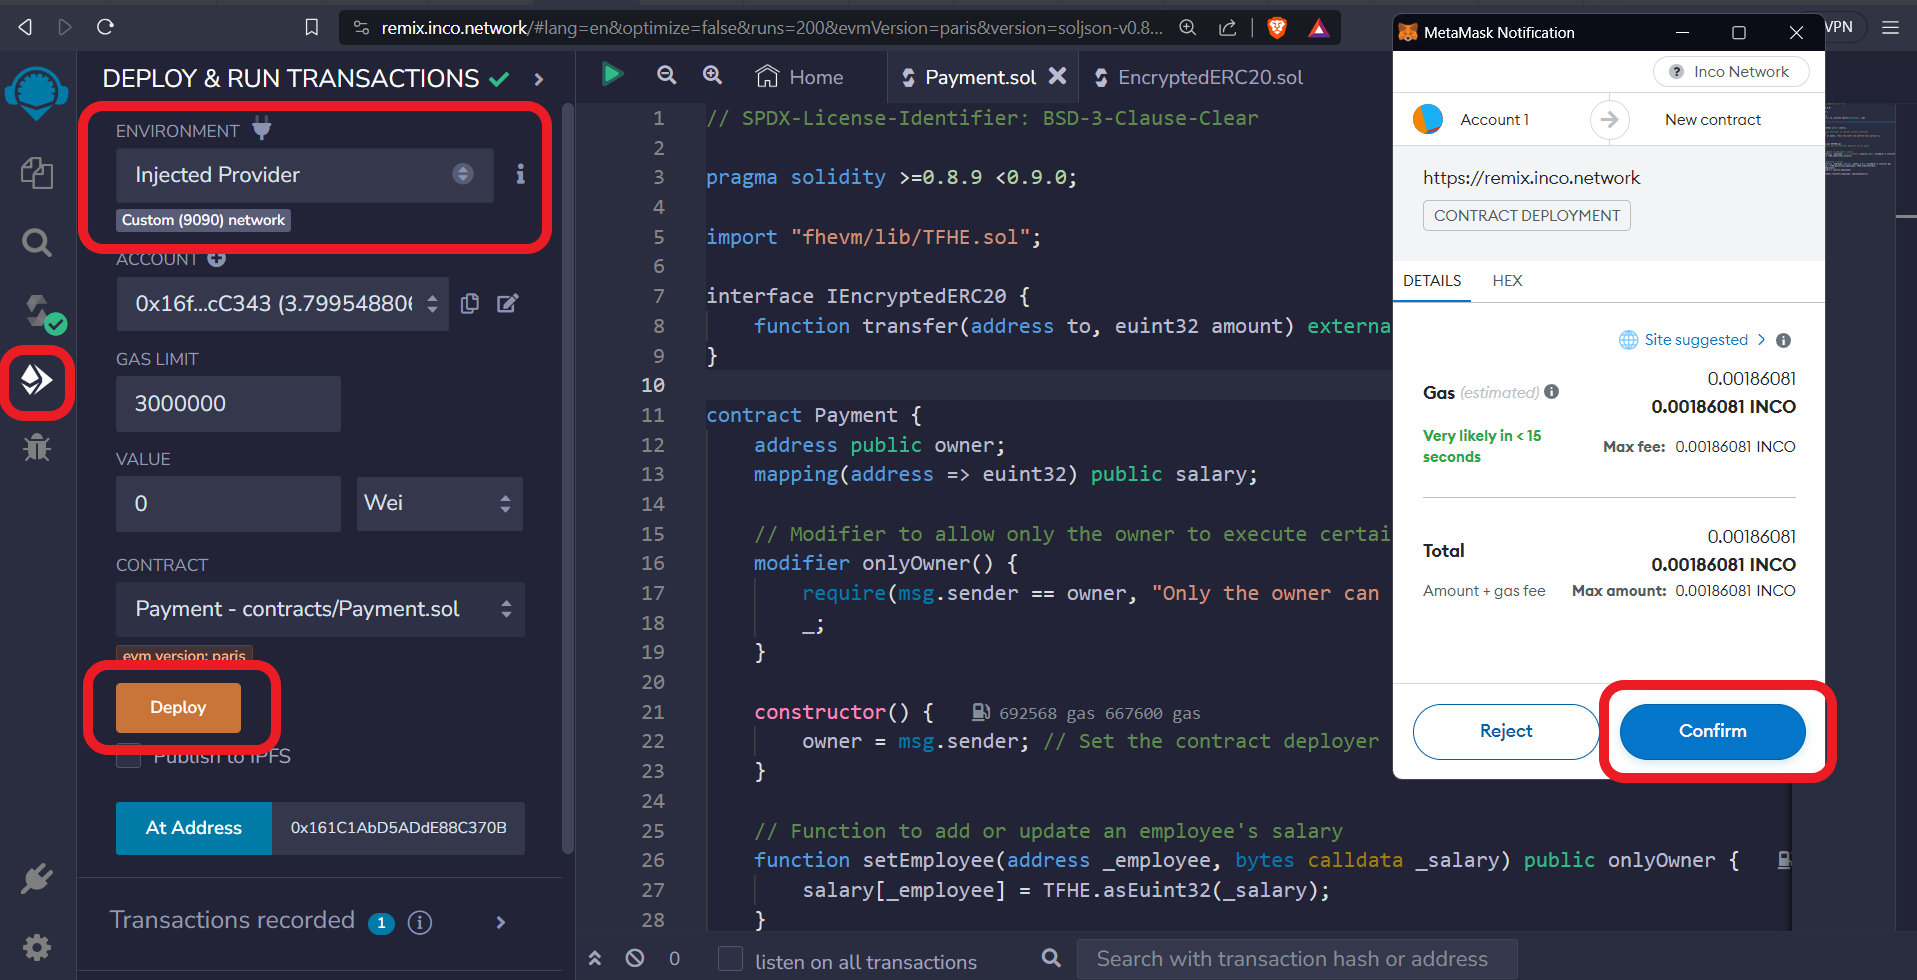
Step 5: Deploy the Payment Smart Contract
In Remix, create a new file named
Payment.soland copy-paste the provided code into the file.Click on 'Environment' and select 'Injected Provider.'
Click on the 'Deploy' button and confirm the transaction in Metamask.
Congratulations, you have successfully deployed the payment smart contract on the Inco network.
Step 6. Interact with Payment Smart Contract
After successfully deploying the smart contract, the next step is to set employee salaries and execute payments. Before proceeding, ensure you fund your Payment smart contract with EncryptedERC20 tokens.
Fund the Contract
Before proceeding, ensure you fund your Payment smart contract with EncryptedERC20 tokens.
Navigate to the EncryptedERC20 contract.
Execute the
transfer()function. Enter the address of the Payment contract in the 'to' parameter.Input the 'encryptedAmount' in plaintext. Then, select
euint32from the dropdown box.
Set Employee
The setEmployee() function stores the employee's address and their salary.
This function requires two inputs: the employee's address and their salary.
Input the salary as a plaintext value.
Select 'euint32' from the dropdown in Inco Remix, which automatically converts the plaintext to bytes.

Pay Employee
The payEmployee() function distributes salaries to employees in EncryptedERC20 tokens.
This function also requires two inputs: the employee’s address and the token’s address.
Enter the employee address, you wish to pay.
Specify the token address you intend to use for the payment.
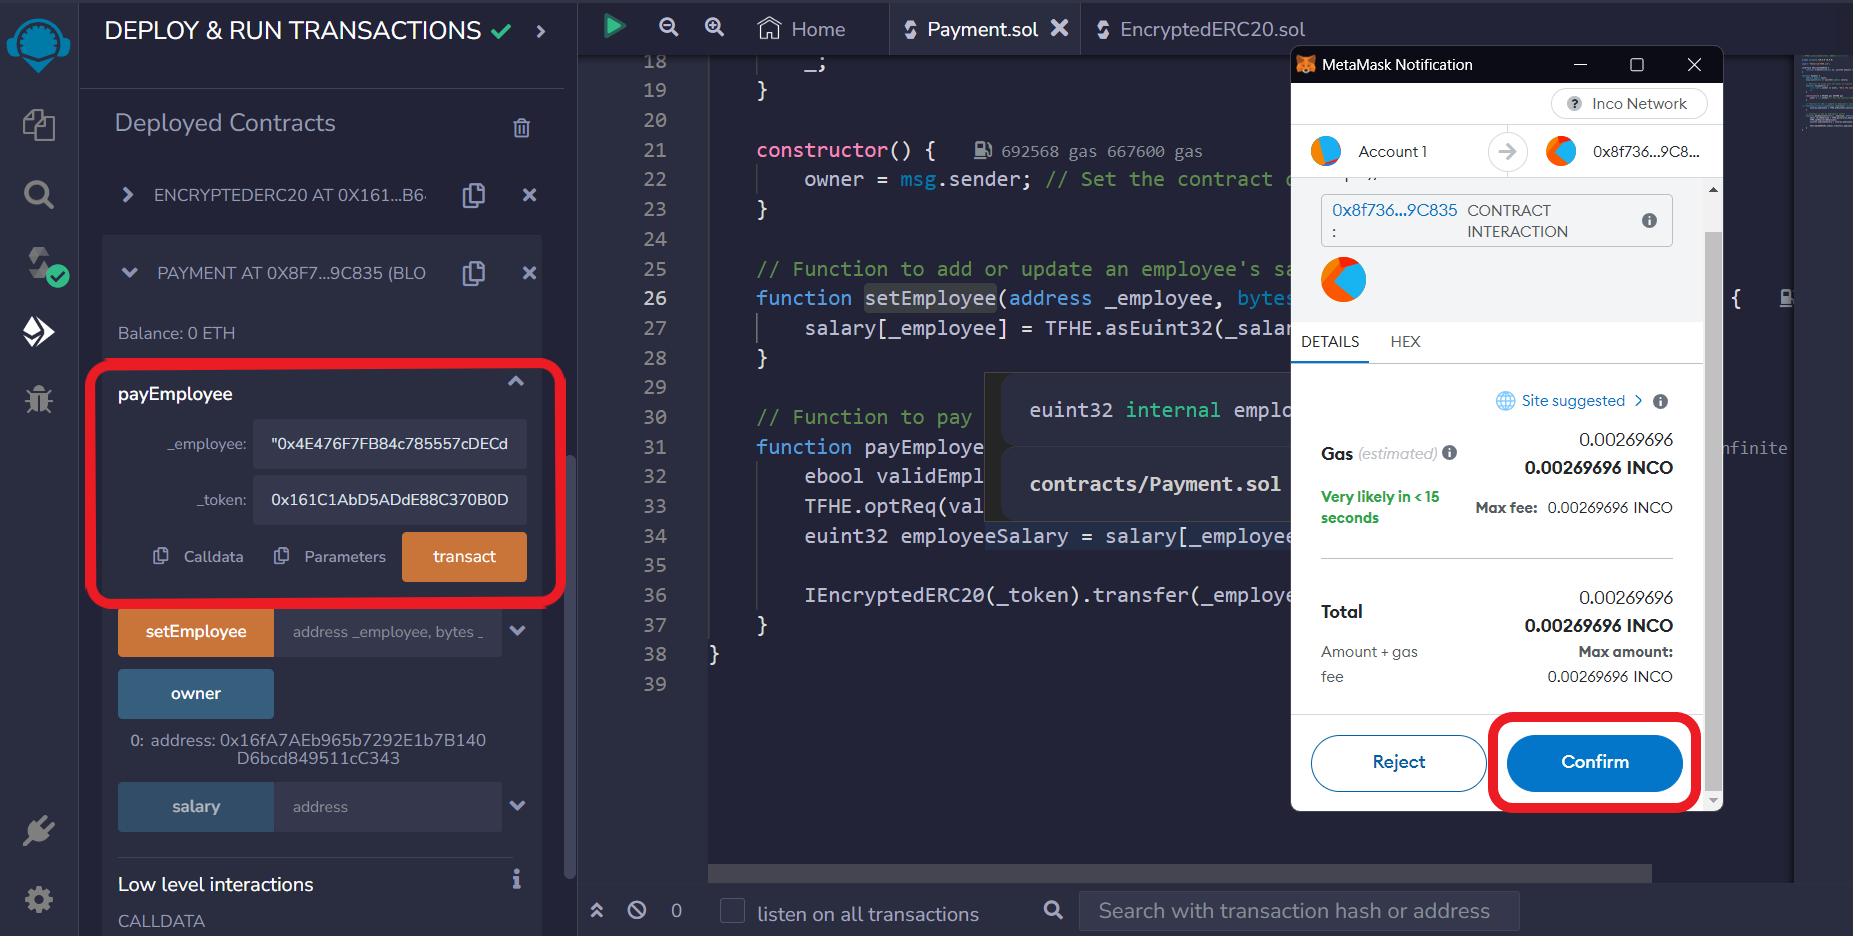
Boom! You've paid the employee. We suggest you experiment with the contracts to gain a deeper understanding of their functionalities. This could include checking the total supply of tokens, verifying the employee's balance, adding new employees, removing employees, and so on.
🎉 Congratulations! 🎉
You've Successfully Completed the fhEVM Smart Contract Developer Tutorial
Take a moment to celebrate your achievement. You've navigated through the complexities of fhEVM and emerged with new skills and knowledge. Here's a recap of your journey:
Understanding the Inco Network:
- You've gained insights into what the Inco Network is and its significance in advancing Web3 adoption.
Setting Up Inco Network in Metamask:
- You learned how to configure your Metamask for the Inco Network and how to claim Inco test tokens.
Mastering Inco Remix and Its Features:
- You've explored the unique features of Inco Remix, enhancing your development experience.
Creating and Deploying Smart Contracts:
- You've gained hands-on experience in creating and deploying smart contracts on the Inco Network, utilizing encrypted data types and operations.
Developing Your Own Encrypted Token:
- You built and deployed your own encrypted token on the Inco Network, a significant milestone in your journey.
Integrating Tokens into DApps:
- You've learned how to use your encrypted token within a DApp, enabling payments to others without revealing the actual amounts.
💥 Simply WOW 💥
If you found this tutorial helpful and enjoyable, consider sharing it with your friends. I hope it has provided you with new insights or helped solve a challenge. Thank you for reading, and I wish you a great time!
Feel free to connect with me on Twitter, GitHub, and LinkedIn. Your suggestions and comments are welcome!
WAGMI 🚀🚀


